
Are you constantly frustrated by your blurry, grainy, or poorly lit video calls? In 2026, with video conferencing being a cornerstone of professional and personal communication, a subpar webcam image can be more than just an annoyance—it can impact your professional presence and personal connections. Many immediately assume the only solution is to splurge on an expensive new webcam, but the truth is often much simpler and significantly cheaper. This comprehensive guide will explain why your webcam looks bad (and how to fix it without buying a new one), focusing on practical, actionable steps to transform your video quality using what you already have. The surprising reality is that lighting, not just resolution, often plays the most critical role in achieving a professional-looking stream.
Key Takeaways
- Lighting is paramount: Good lighting, especially front-facing, often matters more than the webcam's resolution itself.
- Cleanliness counts: A dirty lens is a common, yet easily overlooked, culprit behind blurry video.
- Positioning is key: Avoid harsh backlighting from windows and experiment with camera angles.
- Leverage your smartphone: Modern smartphones offer superior camera quality and can be repurposed as high-end webcams.
- Software can enhance: Utilize software settings and applications to fine-tune your video output.
Cleaning the Lens: The Most Overlooked Fix for Why Your Webcam Looks Bad (And How to Fix It Without Buying a New One)
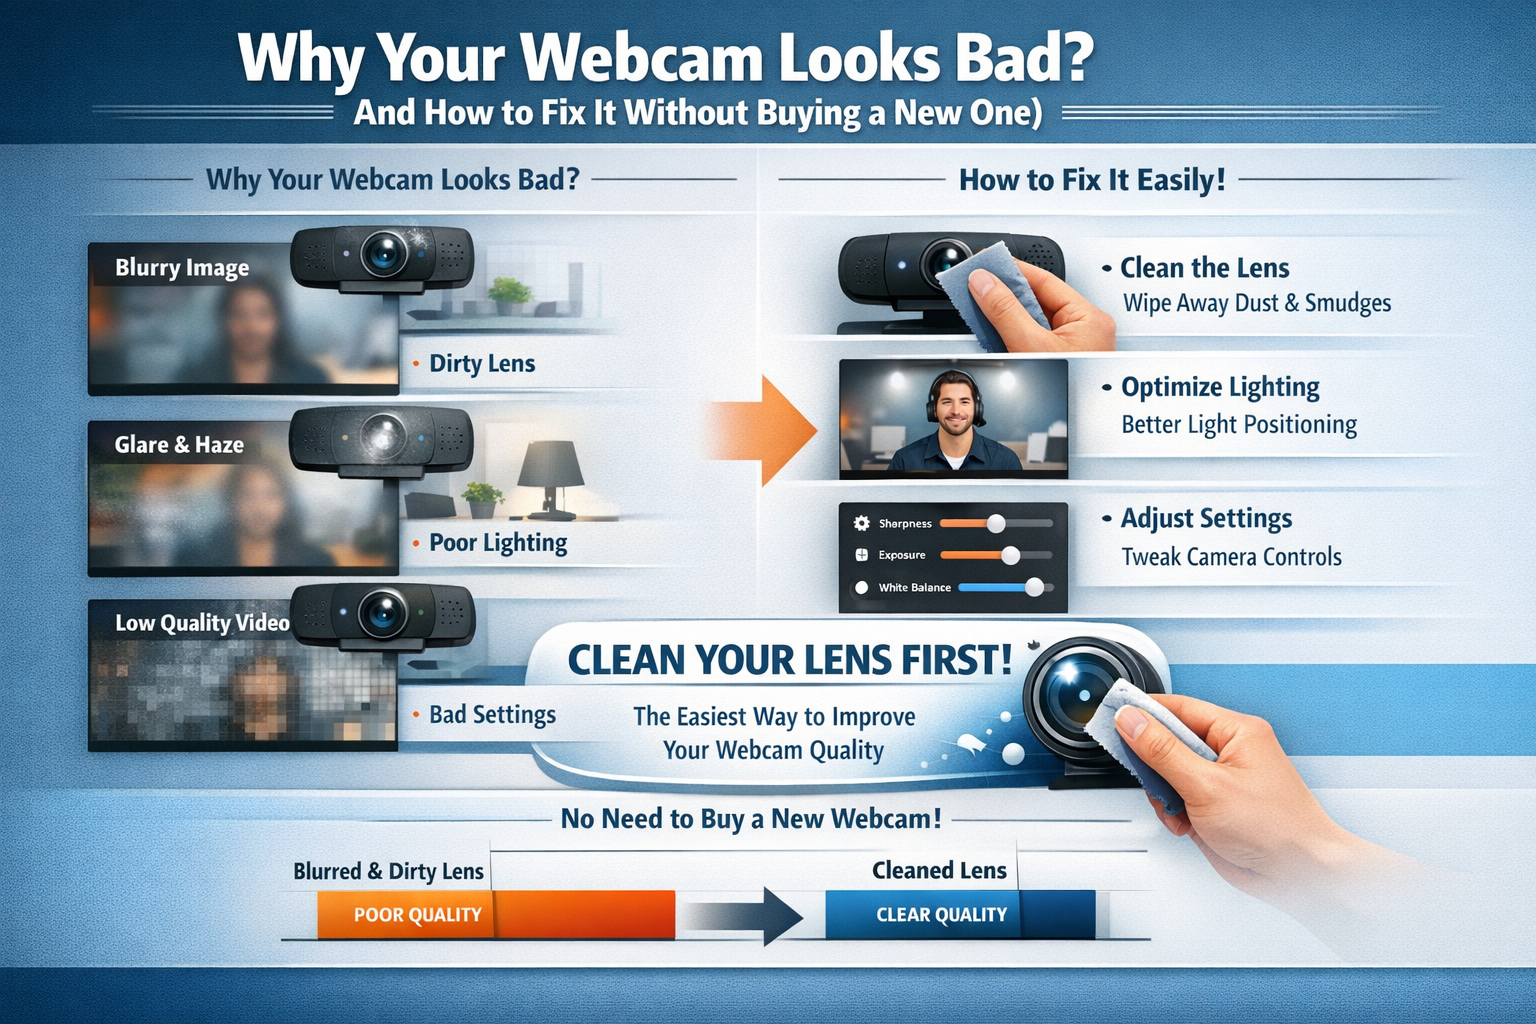
Before diving into advanced settings or external lighting, let's address the most basic, yet frequently ignored, reason why your webcam looks bad (and how to fix it without buying a new one): a dirty lens. Just like your phone camera or eyeglasses, your webcam lens is exposed to dust, fingerprints, and smudges. These seemingly minor imperfections can drastically degrade image clarity, leading to blurry, hazy, or dull video quality.
The Simple Science of Smudges
Think about looking through a smudged window. Everything appears less defined, duller, and somewhat distorted. The same principle applies to your webcam. Dust particles scatter light, reducing contrast and sharpness. Fingerprints leave oily residues that diffuse light unevenly, creating soft focus or blurry patches. Even microscopic specks can have a noticeable impact, especially given the small size of most webcam lenses.
How to Properly Clean Your Webcam Lens
Cleaning your webcam lens is a quick and straightforward process, but it must be done carefully to avoid scratching the delicate surface.
- Gather Your Tools: You'll need a microfiber cloth (the kind used for eyeglasses or camera lenses) and, optionally, a specialized lens cleaning solution or a small amount of distilled water. Avoid harsh chemicals, paper towels, or abrasive materials, as these can permanently damage the lens.
- Power Down: For integrated laptop webcams, it's a good idea to shut down or put your laptop to sleep. For external webcams, unplug them. This prevents accidental activation or static discharge.
- Gentle Wipe: Lightly breathe on the lens to create a slight fog (this helps loosen particles), then gently wipe the lens in a circular motion with the microfiber cloth. Apply very little pressure.
- Stubborn Smudges: If stubborn smudges remain, dampen a small corner of your microfiber cloth with a single drop of lens cleaning solution or distilled water. Wipe gently, then follow up with a dry part of the cloth to remove any moisture.
- Check Your Work: Turn on your webcam and check the live feed. You should immediately notice an improvement in clarity and sharpness.
This simple maintenance step is often all it takes to resolve many common issues contributing to a poor webcam image, making it the first line of defense in understanding why your webcam looks bad (and how to fix it without buying a new one).
Window Placement vs. Artificial Light: Illuminating Your Image
Lighting is arguably the most crucial factor determining your webcam's image quality. Even the most expensive webcam will look terrible in poor lighting conditions. Understanding how to use natural and artificial light sources effectively is key to making your video professional and clear.
The Perils of Backlighting
Many people instinctively set up their workspace facing a window, thinking natural light is always best. While natural light is excellent, its position relative to you and your webcam is critical. If a bright window is behind you, you're creating a severe backlighting problem.
- What happens: Your camera tries to expose for the brightest part of the scene, which is the window. This makes your face appear as a dark, shadowy silhouette. It's difficult to see your features, and the overall image looks amateurish.
- The solution: Reposition your desk so that the window is in front of you, directly illuminating your face. This provides soft, even, natural light that flatters your features and helps your webcam capture a well-exposed image. If you're struggling to secure employment due to a poor video interview, consider exploring opportunities like 26200 Care Home Jobs in UK with Sponsorship or even global options like 62000 Caregiver Jobs in Canada with Visa Sponsorship, where a clear presentation can be vital.
Leveraging Artificial Light Sources
When natural light isn't available or sufficient (e.g., evening calls, overcast days), artificial lighting becomes your best friend. The goal is to create soft, diffused light that illuminates your face evenly, avoiding harsh shadows.
Types of Artificial Light:
- Ring Lights: These are popular for a reason. A circular light that mounts around or near your webcam, a ring light provides even, shadow-reducing illumination directly on your face. Look for models with adjustable brightness and color temperature.
- Softboxes or LED Panels: Professional streamers and content creators often use softboxes or LED panels with diffusers. These create a large, soft light source that mimics natural window light. Position them slightly above and in front of you, angled down.
- Desk Lamps with Diffusers: You can improvise with a standard desk lamp. The trick is to diffuse the light.
- Position: Place the lamp behind your monitor, slightly above it, angled towards your face.
- Diffusion: Cover the lamp with a white t-shirt or a piece of white parchment paper (be careful not to create a fire hazard with hot bulbs). This softens the light and prevents harsh hotspots.
- Overhead vs. Frontal: Avoid relying solely on overhead room lighting, as it often casts unflattering shadows under your eyes and nose. Always aim for frontal lighting, illuminating your face directly.
By strategically positioning your light sources, whether natural or artificial, you can drastically improve why your webcam looks bad (and how to fix it without buying a new one), achieving a bright, clear, and professional appearance without spending a dime on a new camera. This principle applies across various professional contexts, from interviewing for 60000 Hotel Jobs with Visa Sponsorship in the UAE to presenting during an MBA program application for 30000 Yr MBA Scholarships in the U.S. for International Students.
| Lighting Scenario | Effect on Webcam Image | Recommended Fix |
|---|---|---|
| Window Behind You | Silhouette, dark face, washed-out background. | Move desk to face the window; use artificial front light. |
| Overhead Room Light | Harsh shadows under eyes/nose, yellow tint. | Supplement with a ring light or diffused desk lamp positioned in front. |
| Dimly Lit Room | Grainy, noisy video, poor color reproduction. | Add primary front light source (ring light, softbox); increase overall room brightness if possible. |
| Harsh Side Lighting | One side of face bright, other in shadow. | Balance with a second, weaker light source on the shadowed side or diffuse existing light. |
| No Lighting Solutions | Dull, blurry, unprofessional appearance. | Start with a clean lens, then prioritize a single, soft, frontal light source. |
Using Your Smartphone as a High-End Webcam (Software Guide)
One of the most powerful and underutilized solutions for why your webcam looks bad (and how to fix it without buying a new one) is already in your pocket: your smartphone. Modern smartphones, even mid-range models from a few years ago, typically have vastly superior cameras compared to integrated laptop webcams or even many dedicated entry-level external webcams. With the right software, you can easily repurpose your phone as a high-definition webcam, often achieving professional-grade video quality.
Why Your Smartphone's Camera is Better
- Larger Sensors: Smartphone cameras generally have larger image sensors than webcams, which capture more light and produce less noise, especially in lower light conditions.
- Superior Optics: Dedicated camera lenses in smartphones are designed for high-quality photography and videography, resulting in sharper images and better color rendition.
- Advanced Image Processing: Smartphones leverage powerful processors and sophisticated software algorithms to enhance images in real-time, including noise reduction, dynamic range optimization, and color correction.
How to Transform Your Phone into a Webcam
Several applications facilitate turning your smartphone into a webcam, offering both wired (USB) and wireless (Wi-Fi) connection options. Here are some of the most popular and reliable choices in 2026:
1. Camo (iOS & Android)
- Pros: Professional-grade quality, excellent user interface, extensive controls (exposure, focus, white balance, zoom, background effects), supports virtual cameras for multiple applications. Free tier available with limitations; paid version unlocks all features.
- How it Works: Install the Camo app on your smartphone and the Camo Studio software on your computer (Windows or macOS). Connect your phone via USB for the most stable and highest-quality connection, or wirelessly for convenience. Select "Camo Camera" as your video input in your conferencing software.
- Ideal For: Users seeking studio-like control and uncompromising video quality.
2. DroidCam (Android) / EpocCam (iOS)
- Pros: Simple setup, free versions available with basic functionality, supports Wi-Fi and USB connections. DroidCam offers a Pro version with higher resolutions and additional settings.
- How it Works: Install the respective app on your phone and the client software on your computer. Connect via Wi-Fi (requires both devices on the same network) or USB. Select "DroidCam" or "EpocCam" as your webcam source.
- Ideal For: Users looking for a free or low-cost solution with good basic functionality.
3. Iriun Webcam (iOS & Android)
- Pros: Free to use without major feature limitations, supports various resolutions up to 4K (depending on phone and computer), works over Wi-Fi and USB.
- How it Works: Download the app on your phone and the drivers on your computer. Ensure both devices are on the same Wi-Fi network, or connect via USB. Select "Iriun Webcam" as your camera in meeting apps.
- Ideal For: Budget-conscious users who want high resolution without a subscription.
Essential Accessories for Smartphone Webcams
To make your smartphone webcam setup truly effective, consider these accessories:
- Phone Tripod/Mount: A stable stand is crucial. Look for one that securely holds your phone at eye level.
- USB Cable: For the best performance and to keep your phone charged during long calls, a reliable USB cable is recommended.
- Power Source: Your phone will consume battery, so ensure it's either plugged into power or has enough charge for your call.
By leveraging the camera technology you already own, you can significantly upgrade your video conferencing presence, making a lasting impression whether you're interviewing for Canada Job Seeker Visa in 2026 or studying with Netherlands Scholarships 2026. This is a fantastic example of solving why your webcam looks bad (and how to fix it without buying a new one) through smart software utilization.
Conclusion: Save Money by Optimizing What You Have
The prevalence of disappointing webcam video has led many to believe that a costly hardware upgrade is the only remedy. However, as this guide has thoroughly explained, understanding why your webcam looks bad (and how to fix it without buying a new one) primarily involves optimizing your existing environment and equipment. From the simplest act of cleaning your lens to strategically manipulating light sources and even transforming your high-quality smartphone camera into a dedicated webcam, numerous powerful and cost-effective solutions are at your fingertips.
By implementing the advice on lighting—moving away from backlighting and embracing frontal, diffused illumination—you can achieve a dramatic improvement in clarity, color, and overall professionalism. A clean lens ensures your webcam captures the sharpest image possible, removing common haze and blur. And for those seeking truly superior video, the smartphone webcam solution offers an often-overlooked avenue to leverage cutting-edge camera technology without an additional purchase.
In 2026, a clear and professional video presence is no longer a luxury but a necessity for many aspects of life, from remote work and online education to personal connections. Before you hit that "buy" button on a new webcam, take the time to experiment with these fundamental adjustments. You'll likely discover that the solution to why your webcam looks bad (and how to fix it without buying a new one) isn't about spending more money, but rather about smarter utilization of what you already possess. Embrace these actionable steps, and prepare to elevate your video calls from frustratingly fuzzy to strikingly professional.
SEO Meta Title: Fix Your Bad Webcam: Free Pro Tips for 2026 Video Calls
SEO Meta Description: Is your webcam blurry or dark? Learn why your webcam looks bad and how to fix it without buying a new one using lighting, cleaning, and smartphone tricks in 2026.