Picture this: It's 3 PM on a Tuesday, and your neck feels like someone's been using it as a stress ball. Your shoulders are hunched forward, your spine resembles a question mark, and you've got a headache that won't quit. The culprit? That sleek laptop sitting flat on your desk, forcing you to crane your neck downward for hours on end. The average person spends over 6 hours daily looking at screens, and when that screen sits too low, the consequences pile up fast—chronic neck pain, tension headaches, and long-term postural damage. The good news? You don't need to drop $200 on a fancy ergonomic stand. With some creativity and basic materials, you can create DIY Laptop Stand Ideas (That Actually Look Good) that solve your ergonomic nightmare while adding style to your workspace.
Key Takeaways
- Proper laptop elevation reduces neck strain by up to 60% when the screen sits at eye level, preventing the forward head posture that causes chronic pain
- DIY laptop stands can be built for under $20 using everyday materials like books, wood, or PVC pipes while matching professional aesthetics
- Airflow is critical—any laptop stand design must incorporate ventilation to prevent overheating and maintain device performance
- The ideal laptop stand height is 5-6 inches for most users, positioning the top of the screen at or slightly below eye level
- Aesthetic matters—choosing materials and finishes that complement your workspace ensures you'll actually use your DIY solution long-term
The "Stack of Books" Method (Refined)

Let's address the elephant in the room: yes, everyone's first instinct is to grab whatever books are nearby and stack them under their laptop. While this works in a pinch, the typical haphazard pile of mismatched paperbacks screams "temporary solution" rather than intentional workspace design. The refined stack method transforms this basic concept into something genuinely attractive.
Choosing Your Books Strategically
The secret to making stacked books look intentional lies in curation and coordination. Select hardcover books of similar sizes—ideally coffee table books, photography collections, or design volumes that share a color palette. Aim for 3-4 books that create a stable platform approximately 5-6 inches tall.
Color coordination options:
- Monochromatic elegance: All white or all black spines create a minimalist aesthetic
- Tonal harmony: Shades of blue, grey, or earth tones that complement your desk
- Accent pop: Bold colors that match other workspace elements like your chair or wall art
Stability Enhancements
Raw stacked books can shift and slide, creating an unstable platform. Add these simple upgrades:
- Non-slip shelf liner between each book prevents sliding
- Rubber furniture pads on the bottom protect your desk surface
- Clear corner bumpers on top edges prevent laptop scratches
- Fabric book covers in matching colors if your existing books don't coordinate
The beauty of this method is its flexibility. Need to adjust height for different tasks? Simply add or remove a book. Working from different locations? The materials are universally available. For students managing tight budgets while pursuing educational opportunities abroad, this zero-cost solution provides immediate ergonomic relief.
Making It Permanent
If you love the book stack aesthetic but want something more permanent, consider adhering the books together with strong double-sided mounting tape or bookbinding glue. This creates a solid, immovable platform while maintaining the literary aesthetic. Seal the edges with clear polyurethane for durability and easy cleaning.
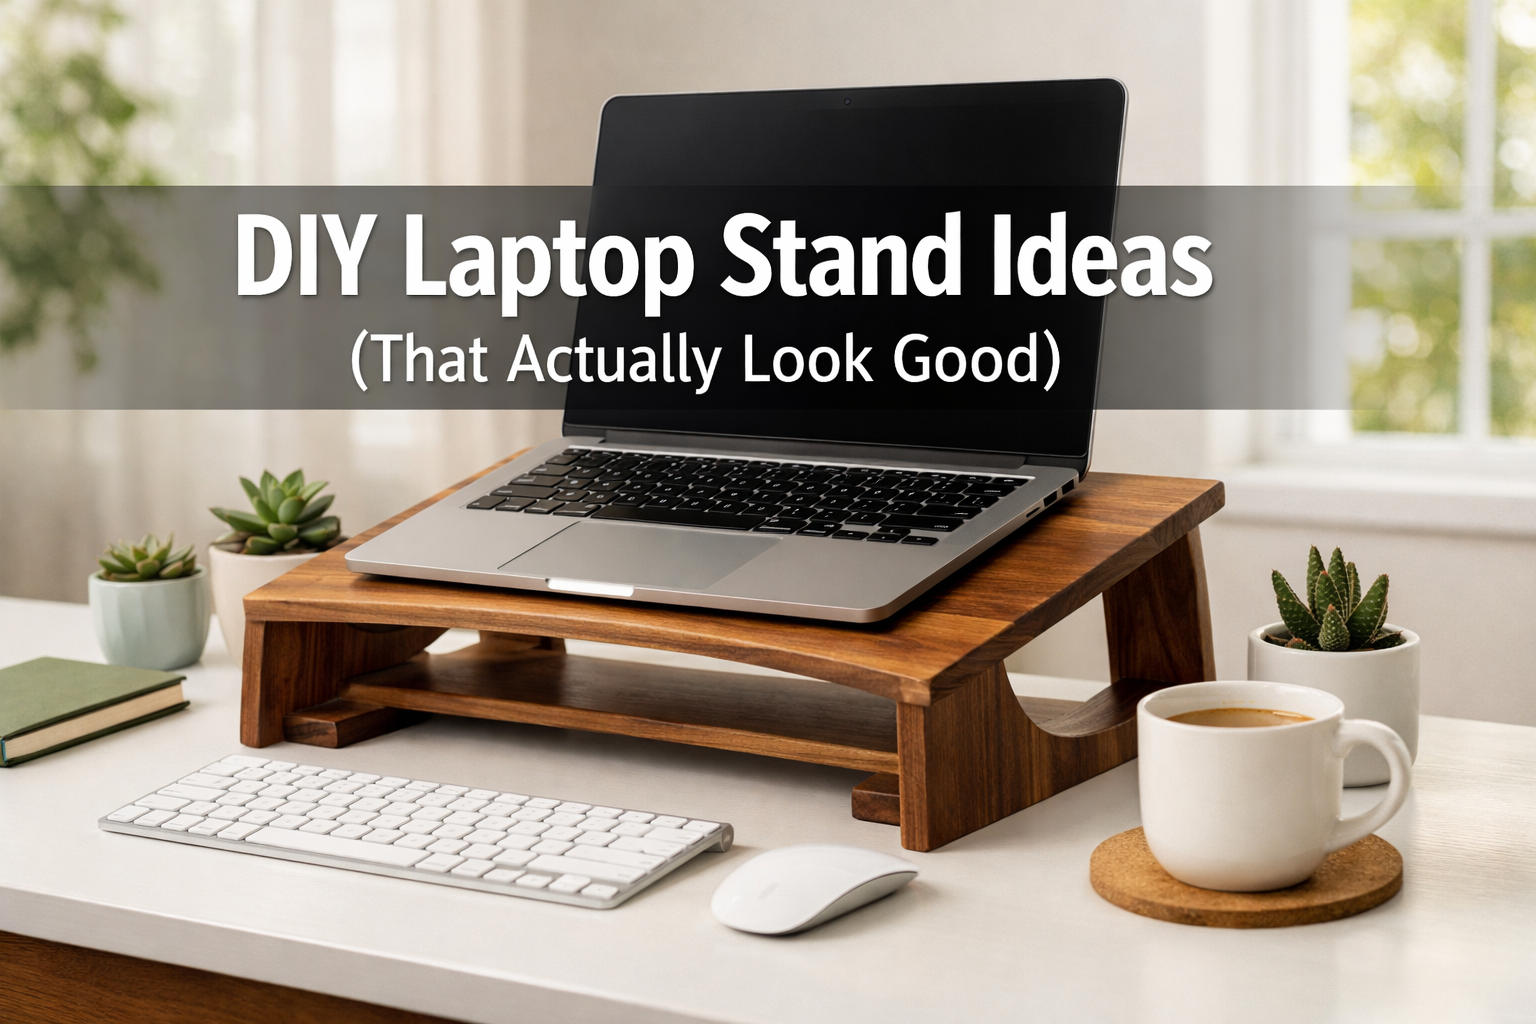
Building a Wooden Riser (Simple Schematic)
For those ready to invest a weekend afternoon, a custom wooden laptop stand offers durability, perfect sizing, and genuine craftsmanship appeal. Don't worry—this project requires minimal woodworking experience and basic tools most people already own or can borrow.
Materials You'll Need
| Material | Quantity | Approximate Cost |
|---|---|---|
| Birch plywood (1/2" thick) | 1 sheet (2'x2') | $12-15 |
| Wood glue | 1 bottle | $4-6 |
| Sandpaper (120 & 220 grit) | 2 sheets each | $3-5 |
| Wood stain or paint | 1 can | $8-12 |
| Polyurethane finish | 1 can | $10-15 |
| Total | $37-53 |
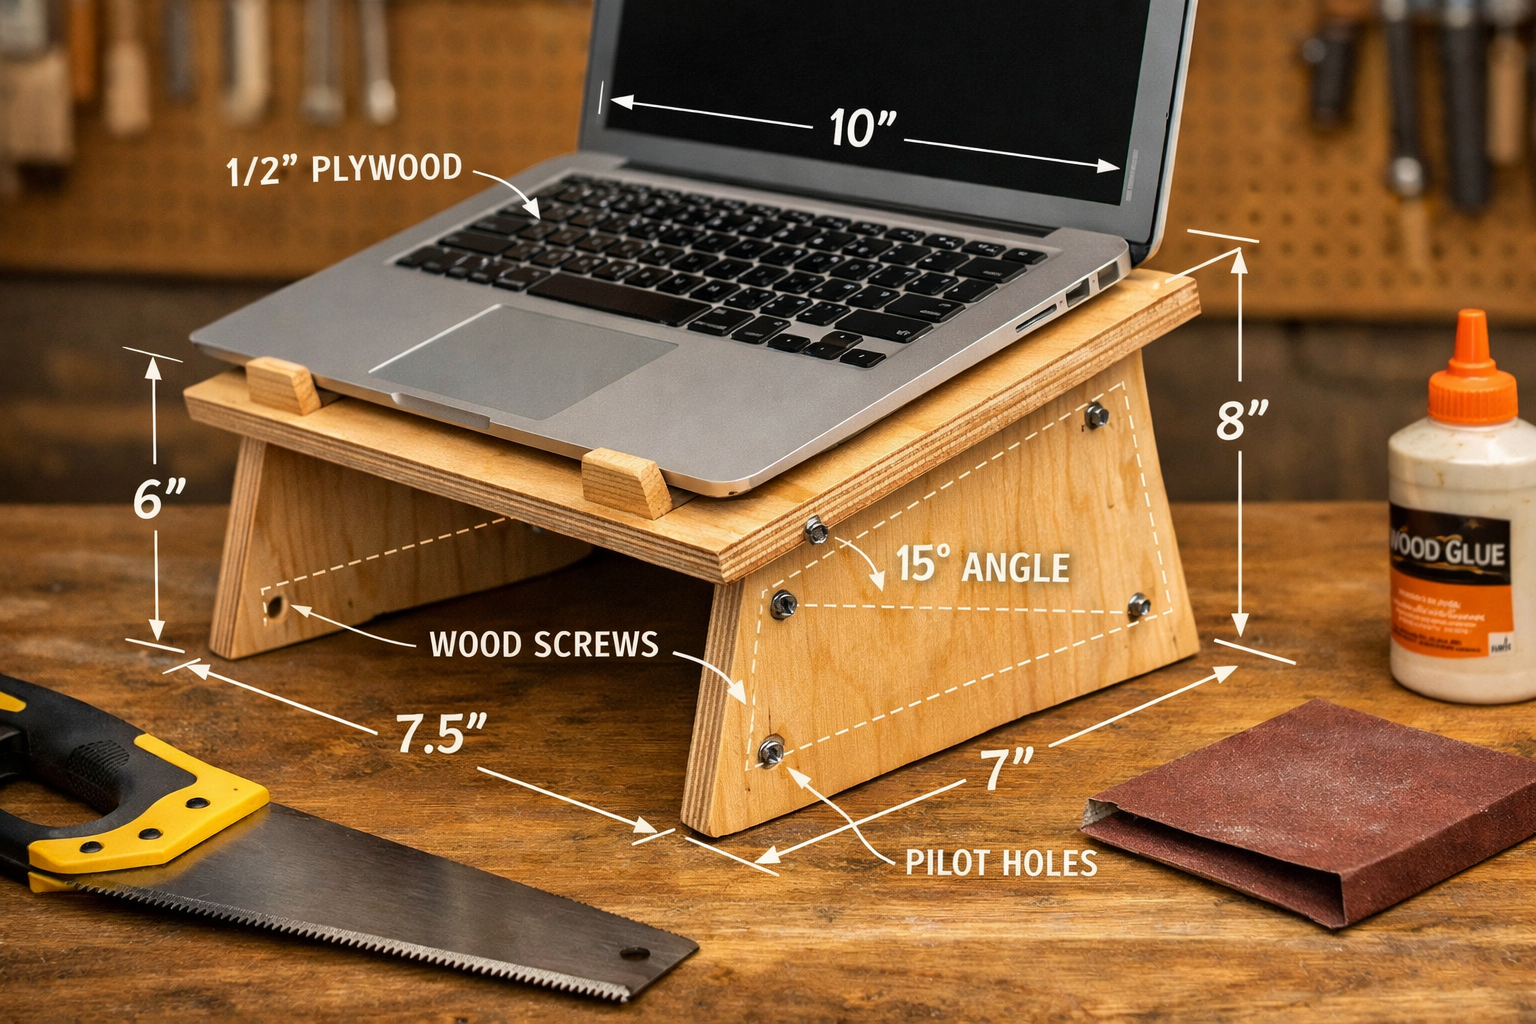
The Basic Design
The simplest effective design is an angled riser platform that elevates your laptop while maintaining stability. Here's the schematic:
Front piece: 12" wide x 2" tall
Back piece: 12" wide x 6" tall
Base platform: 12" wide x 10" deep
Top platform: 12" wide x 10" deep
Side supports: Two triangular pieces (10" base x 6" height)
Step-by-Step Construction
- Cut your pieces using a handsaw or have them cut at the hardware store (most offer free cutting services)
- Sand all edges thoroughly with 120-grit, then 220-grit sandpaper for smooth finish
- Assemble the frame by gluing side supports to the base platform
- Attach the top platform at the desired angle (typically 15-20 degrees)
- Add front and back lips to prevent laptop sliding
- Clamp and dry for 24 hours
- Apply finish with stain or paint, followed by protective polyurethane
💡 Pro Tip: Cut ventilation slots into the top platform using a jigsaw—create 3-4 parallel slots (1/2" wide, 8" long) running front to back for optimal airflow.
Aesthetic Customization Options
The beauty of building your own stand lies in complete design control:
- Scandinavian minimalist: Light birch with clear finish and clean lines
- Industrial modern: Dark walnut stain with metal corner brackets
- Colorful statement: Bold paint colors (navy, sage, coral) that pop against neutral desks
- Natural rustic: Reclaimed wood with visible grain and matte finish
For professionals working remotely while exploring international career opportunities, a polished wooden stand projects professionalism during video calls while protecting long-term health.
Advanced Features to Consider
Once you've mastered the basic design, consider these upgrades for DIY Laptop Stand Ideas (That Actually Look Good):
- Built-in cable management: Route a groove along the back edge for charging cables
- Smartphone slot: Cut a vertical slot in the front lip for phone storage
- Drawer compartment: Add a shallow drawer underneath for pens and accessories
- Adjustable height: Install rubber feet of varying heights that screw in/out
Heat Management: Ensuring Airflow
Here's where many beautiful DIY stands fail functionally: they trap heat and throttle your laptop's performance. Modern laptops generate significant heat, and most rely on bottom vents for cooling. A solid platform that blocks these vents can cause overheating, reduced performance, and shortened device lifespan.
Why Airflow Matters
Laptop processors can reach temperatures exceeding 90°C (194°F) under heavy loads. Inadequate ventilation causes:
- ⚠️ Thermal throttling: CPU automatically slows down to prevent damage
- ⚠️ Fan noise: Cooling fans run at maximum speed constantly
- ⚠️ Reduced lifespan: Heat degrades internal components over time
- ⚠️ Performance drops: Slower processing speeds and lag
- ⚠️ Battery degradation: Heat damages lithium-ion battery chemistry
Ventilation Design Principles
Any DIY laptop stand must incorporate strategic airflow channels:
Minimum requirements:
- At least 40% of the platform surface should be open space
- Ventilation openings should align with laptop vent locations
- Minimum 1-inch clearance between desk surface and laptop bottom
- Cross-ventilation allowing air to flow front-to-back or side-to-side
Ventilation Solutions by Material
For book stacks:
- Place pencils or dowels between books to create air gaps
- Use books with textured covers that don't sit completely flat
- Position the stack so laptop vents hang over the edge
For wooden stands:
- Cut parallel ventilation slots (as mentioned earlier)
- Drill a honeycomb pattern of 1/2" holes across the platform
- Create an open-frame design with minimal contact points
- Use wooden slats instead of solid platforms
For metal or PVC designs:
- Wire mesh platforms provide maximum airflow
- Perforated metal sheets combine strength with ventilation
- Open lattice frameworks minimize heat retention
Testing Your Stand's Cooling Performance
Before committing to daily use, run a simple heat test:
- Download a temperature monitoring app (HWMonitor, Core Temp, etc.)
- Note your laptop's idle temperature
- Run a processor-intensive task for 30 minutes (video rendering, gaming, etc.)
- Compare temperatures with and without your DIY stand
- Ideal result: 5-10°C cooler with the stand versus flat on desk
If temperatures remain similar or increase, your design needs more ventilation. This is critical for anyone working long hours, whether they're managing remote positions or pursuing advanced degrees that require intensive computing.
Additional Cooling Enhancements
Beyond structural ventilation, consider these supplementary cooling methods:
- Laptop cooling pads: Integrate a USB-powered cooling pad into your stand design
- Elevation feet: Add taller rubber feet (1.5-2 inches) for increased bottom clearance
- Thermal management: Place your stand near (but not blocking) air conditioning vents
- Regular maintenance: Clean laptop vents monthly to prevent dust buildup
"The best laptop stand in the world won't help if your device is overheating. Airflow isn't optional—it's fundamental to both device longevity and user comfort." — Ergonomic Design Principles, 2026
Material Considerations for Heat
Some materials conduct heat better than others, affecting your DIY Laptop Stand Ideas (That Actually Look Good):
Best materials (low heat retention):
- ✅ Aluminum and metal (excellent heat dissipation)
- ✅ Bamboo (natural ventilation properties)
- ✅ Wire mesh or perforated materials
- ✅ Open-frame wood designs
Materials requiring extra ventilation:
- ⚠️ Solid wood platforms
- ⚠️ Acrylic or plastic sheets
- ⚠️ Dense stacked materials (books, cardboard)
For professionals transitioning between countries for specialized work opportunities or skilled positions, a portable DIY stand with proper ventilation ensures consistent performance regardless of climate or workspace.
Bonus Ideas: Alternative DIY Laptop Stand Designs
Beyond books and wood, creative materials offer unique aesthetic possibilities:
The Industrial PVC Stand
Using PVC pipes and connectors creates a modern industrial look that's incredibly sturdy:
- Four vertical pipes (6" tall) as legs
- Two horizontal pipes (12" long) as front/back supports
- T-connectors and elbow joints for assembly
- Spray paint in matte black, copper, or metallic finishes
- Total cost: $15-20
- Assembly time: 30 minutes (no glue needed)
The Minimalist Acrylic Riser
Clear acrylic sheets create an invisible, floating effect:
- Purchase pre-cut acrylic from craft stores
- Use acrylic cement to bond pieces
- Creates ultra-modern, barely-there aesthetic
- Drill ventilation holes in a geometric pattern
- Perfect for glass or white desks
The Eco-Friendly Cardboard Stand
Corrugated cardboard offers surprising strength when properly designed:
- Use triangular support structures for stability
- Multiple layers laminated together
- Cover with contact paper or fabric for finished look
- Completely recyclable and customizable
- Ideal for temporary workspaces or frequent movers
The Vintage Crate Stand
Repurposed wooden crates provide rustic charm with built-in storage:
- Turn a small wooden crate on its side
- Sand and refinish for smooth surface
- Built-in compartment for supplies
- Naturally ventilated through slat construction
- Source from craft stores or vintage shops
For individuals relocating for international opportunities or seasonal work, lightweight designs like PVC or cardboard offer portability without sacrificing functionality.
Ergonomic Considerations Beyond Height
While elevation is crucial, truly effective DIY Laptop Stand Ideas (That Actually Look Good) address multiple ergonomic factors:
Screen Distance and Angle
- Optimal distance: 20-28 inches from eyes to screen
- Screen angle: Slight backward tilt (10-20 degrees) reduces glare
- Top of screen: Should align with or slightly below eye level when sitting upright
Keyboard and Mouse Position
Raising your laptop creates a keyboard angle problem. Solutions include:
- External keyboard and mouse positioned at elbow height
- Laptop keyboard tilted at 0-15 degrees (not the 30+ degrees of most stands)
- Negative tilt keyboard trays for neutral wrist position
Integration with External Peripherals
Most people using laptop stands also use external monitors, keyboards, and mice:
- Position laptop as secondary screen to the side
- Use laptop stand to match height with external monitor
- Create a dual-screen setup with coordinated heights
Posture Reminders
Even with the perfect stand, posture breaks matter:
- Stand and stretch every 30-45 minutes
- Follow the 20-20-20 rule (every 20 minutes, look 20 feet away for 20 seconds)
- Adjust chair height so feet rest flat on floor
- Keep shoulders relaxed, not hunched forward
Cost Comparison: DIY vs. Commercial Stands
Let's be honest about the financial motivation behind DIY projects:
| Stand Type | DIY Cost | Commercial Equivalent | Savings |
|---|---|---|---|
| Book stack (refined) | $0-15 | $40-60 | $40-60 |
| Wooden riser | $37-53 | $80-150 | $43-97 |
| PVC industrial | $15-20 | $50-75 | $35-55 |
| Acrylic minimalist | $25-35 | $90-120 | $65-85 |
Beyond immediate savings, DIY stands offer customization impossible with commercial products—exact dimensions for your laptop, colors matching your aesthetic, and features addressing your specific needs. For students managing budgets while pursuing educational opportunities or specialized programs, these savings are substantial.
Conclusion: A Weekend Project That Saves Your Posture
The neck pain, shoulder tension, and headaches caused by poor laptop ergonomics aren't minor inconveniences—they're genuine health issues that compound over time. The average professional spends over 1,800 hours annually at their computer, and every one of those hours with improper posture accelerates musculoskeletal damage. The solution doesn't require expensive equipment or professional intervention. With basic materials, a few hours of effort, and attention to both form and function, anyone can create DIY Laptop Stand Ideas (That Actually Look Good) that genuinely improve daily comfort and long-term health.
Your Next Steps
Ready to transform your workspace? Here's your action plan:
- Assess your current setup: Measure your screen height and identify ergonomic problems
- Choose your design: Select the DIY approach that matches your skills, budget, and aesthetic preferences
- Gather materials: Make a shopping list and visit your local hardware or craft store
- Build this weekend: Dedicate 2-4 hours to construction and finishing
- Test and adjust: Use your stand for a week, then modify height or angle as needed
- Add peripherals: Invest in an external keyboard and mouse for complete ergonomic setup
The difference between chronic discomfort and daily wellness often comes down to simple environmental modifications. A laptop stand won't solve every workspace problem, but it addresses one of the most common and damaging ergonomic mistakes. Whether you're working remotely, studying for advanced degrees, or building a career in specialized fields, your physical comfort directly impacts your productivity and long-term success.
Start with the refined book stack method today—it requires zero investment and five minutes of effort. If it improves your comfort (which it will), commit to building a permanent solution this weekend. Your neck, shoulders, and future self will thank you. 💪